
Follow Me On Social Media!

Cake Balls: The Sweet Treat You Must Try!
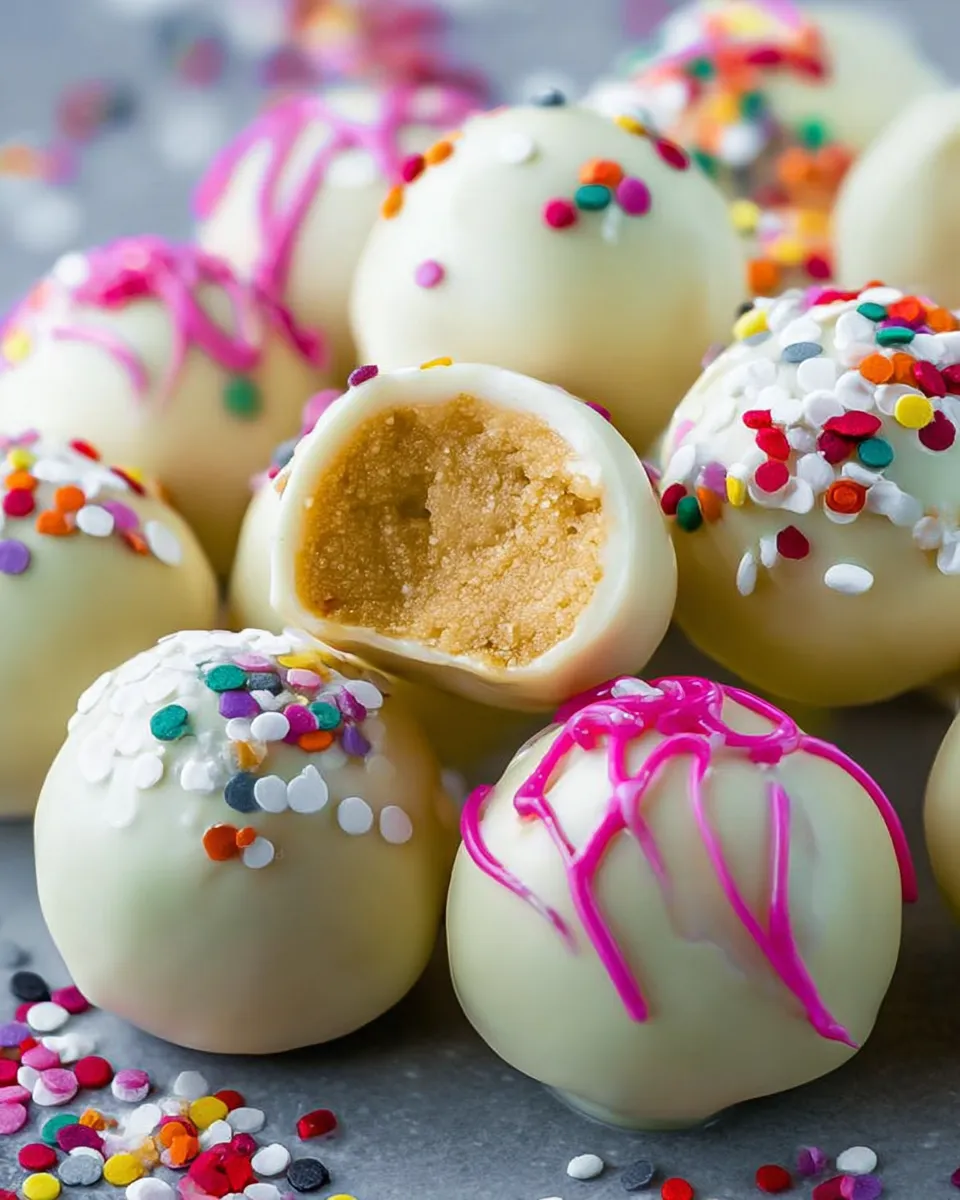
Cake balls are a delightful treat that has captivated dessert lovers everywhere. These small, spherical confections are made by blending crumbled cake with frosting, then coating them in a rich layer of chocolate or candy melt. Their irresistible bite-sized nature makes them perfect for celebrations, gatherings, or simply indulging in a sweet craving. Moreover, their versatility allows for endless flavor combinations, transforming any leftover cake into something truly special.
As their popularity continues to rise, cake pops have garnered attention for their aesthetic appeal and deliciousness. Not only do these sweet bites bring joy to those who eat them, but they also provide an excellent canvas for creativity. Whether you’re hosting a birthday party, wedding reception, or holiday celebration, incorporating these delightful morsels into your dessert table will undoubtedly impress your guests. In this article, we will explore various recipes, tips, and ideas to create stunning cake balls that will have everyone coming back for more!
Ingredients for cake balls:
- 1 box of cake mix (flavor of your choice)
- Ingredients required on the cake mix box (eggs, oil, and water)
- 1 cup + 2 tablespoons canned frosting (flavor of your choice)
- 1 pound candy melts (Ghirardelli Melting Wafers are recommended)
- 1/2 cup sprinkles
How to Make Delightful Cake Pops
To start, prepare your cake mix following the directions on the box. This typically involves combining eggs, oil, and water. Once that’s complete, bake the cake in a 9” x 13” pan according to the package instructions, ensuring it’s perfectly baked. After baking, allow your cake to cool completely.
Next, break apart the cooled cake, crumbling it into fine crumbs. This step is crucial as it helps ensure that your dough has the right texture. Then, add in your frosting of choice; mix well until a pliable dough forms. If you feel the mixture is a bit dry, simply incorporate additional frosting—add one tablespoon at a time until you reach your desired consistency.
Once your mixture is prepared, roll it into tablespoon-sized balls and place them on a parchment-lined baking sheet. Chill these delightful morsels for at least one hour; this not only helps them set but makes them easier to dip in chocolate later.
Coating Your Cake Treats
Now that your cake balls are chilled, it’s time to melt the candy melts. You’ll want to use a microwave-safe bowl, heating the melts in 30-second increments for a smooth texture. When they’re fully melted and glossy, take each cake ball and place it on a fork. Using a spoon, pour the melted candy over the ball. This creates a beautiful coating.
After coating, let each cake ball drip slightly against the side of the bowl to remove any excess candy. Place them back on the parchment-lined sheet, and for an extra festive touch, don’t forget to top them with sprinkles!
These cake pops can be stored in the refrigerator until you’re ready to devour them. They can even be made up to three days in advance, making them an excellent choice for any gathering. If you’re interested in exploring more decadent desserts, check out this Pumpkin Cheesecake Truffles recipe for an autumn-inspired treat!
How to prepare:
Cake balls are a delightful treat perfect for any occasion. To create these tasty bites, start by preparing your cake mix according to the package instructions. Use the required eggs, oil, and water to ensure the cake is perfectly moist and flavorful. Once baked in a 9”x13” pan, allow the cake to cool completely. This step is crucial because it allows the cake to firm up, making it easier to crumble.
Creating the Cake Mixture
After cooling, break the cake apart and crumble it into fine crumbs. Next, it’s time to add flavor and moisture. Incorporate one cup plus two tablespoons of canned frosting of your choice into the crumbled cake. Mix thoroughly until you achieve a dough-like consistency. If the mixture feels a bit dry, you can add more frosting, one tablespoon at a time, until it reaches your desired texture. This will ensure that your cake balls hold together well.
Shaping and Chilling
Once your dough is ready, roll it into tablespoon-sized balls. Remember, uniform sizes will help them dip and set more easily. Place these cake bites onto a parchment-lined baking sheet and chill them in the refrigerator for at least one hour. Chilling helps them firm up, making them easier to coat later with candy melts.
Dipping in Chocolate
While waiting, prepare your candy melts. I recommend using Ghirardelli Melting Wafers for a smooth finish. Melt the candy in a microwave-safe bowl, heating in 30-second intervals. Stir until completely smooth. To coat, take a chilled cake ball and place it on a fork. Gently pour the melted candy over the ball using a spoon, allowing excess to drip back into the bowl. This method ensures an even coating.
Place each coated cake bite back onto your parchment-lined sheet and sprinkle with your favorite toppings. Be creative! Your cake balls can be stored in the refrigerator for up to three days, making them a convenient and delicious treat. For those who enjoy flavors inspired by desserts, you might want to check out this pumpkin cheesecake truffle recipe for another festive delight!
Creative Variations:
When it comes to delightful desserts, cake balls offer endless opportunities for creativity. These bite-sized treats can be customized in various ways, making them perfect for every occasion. Whether you want something seasonal or just a fun new flavor combination, let’s explore some captivating variations!
Seasonal Flavors and Ingredients
One fantastic way to elevate your cake balls is by intertwining seasonal flavors. For instance, autumn provides the ideal backdrop for utilizing ingredients like pumpkin or apples. A delightful concept is to create pumpkin cheesecake truffles, inspired by pumpkin cheesecake truffles. By incorporating warm spices like cinnamon and nutmeg, you can evoke the essence of fall. Simply mix your cake crumbs with cream cheese, roll into balls, and dip in white chocolate infused with these flavors for a warm, cozy treat.
Incorporating Rich Flavor Profiles
To add a touch of elegance to your cake balls, consider incorporating decadent flavors like salted caramel or chocolate ganache. Taking inspiration from salted caramel cheesecake, drizzle some salty caramel sauce over the coated cake balls for an extra burst of flavor. This combination satisfies those sweet and salty cravings, leaving a lasting impression.
Experiment with Textures
Another creative angle is to blend different textures. Imagine combining the softness of cake with crunchy elements. Incorporating crushed nuts or cookies adds a delightful crunch to your cake balls. You might even want to branch out by rolling your cake balls in graham cracker crumbs to mimic a s’mores experience.
Personal Touches
Lastly, don’t shy away from personalizing your cake balls to reflect your unique tastes or to celebrate special events. For instance, choosing vibrant colors or themes can transform these treats into perfect party favors. Adding edible glitter or themed sprinkles can elevate their appearance, making them not only delicious but visually appealing too.
To explore more delicious cake-related recipes and creative treats, check out culinary resources like Tasty With Mia. No matter how you choose to customize your cake balls, you’re bound to delight anyone who tastes them! Enjoy the process, and let your imagination run wild with these little cake delights!
Perfecting the Texture of Cake Balls:
Creating delightful cake balls requires attention to detail, especially when it comes to achieving the perfect texture. The balance of moisture, density, and flavor plays a crucial role in the overall outcome of these bite-sized treats. Below are key considerations that will help elevate your cake ball-making game.
Choose the Right Cake Base
The foundation of any cake ball is the cake mix itself. To ensure your cake balls have the ideal texture, use a cake that is moist but not overly dense. A good option is a recipe for a light cream caramel cake. This type of cake provides the right amount of moisture, guaranteeing that your cake pops won’t crumble or become too dry. Alternatively, you could opt for a rich chocolate cake with a mocha twist to keep things interesting.
Effective Crumbling and Mixing
Once baked, allow the cake to cool completely before crumbling it into fine pieces. This step ensures a uniform texture throughout the cake balls. You can use your hands or a food processor for this task. After crumbling, mix in your frosting. Aim for a balance where the mixture is moist enough to hold together, yet still pliable. A common mistake is to add too much frosting, which can lead to overly sweet and soft cake balls.
Chilling for Structure
After shaping your cake balls, it’s essential to chill them before any coating. Refrigerating for 30 minutes allows the balls to firm up, making them easier to dip in chocolate or candy melts. If you plan on adding any additional decorations, now is the perfect time. Try rolling them in crushed nuts or sprinkles for added texture and flavor.
Melting and Coating
Finally, the outer coating of your cake balls should also be perfectly balanced. Use high-quality chocolate or candy melts for dipping. Ensure that your coating is warm, yet not too hot, as this can cause the cake balls to lose their shape. A thin layer works best for a cake ball; this not only enhances flavor but also maintains an appealing texture.
In conclusion, mastering the texture of cake balls involves careful selection of ingredients and techniques. By following these guidelines, your cake balls will turn out delectable every time. For a seasonal twist, check out this pumpkin cheesecake truffles recipe that embraces autumn flavors in a similar format. Enjoy creating cake balls and explore new variations endlessly!
Storage tips for cake balls:
When it comes to preserving the delightful taste and texture of cake balls, proper storage is essential. These bite-sized treats, made from crumbled cake and frosting, can easily dry out or absorb unwanted odors if not stored correctly. Here are some effective tips to maintain their freshness.
Room Temperature Storage
If you plan to consume your cake balls within a couple of days, storing them at room temperature is a great option. Place the cake balls in an airtight container. Make sure to line the container with parchment paper to absorb any excess moisture. This method helps prevent them from sticking together while keeping them soft. It’s also a good idea to store them in a cool, dark place away from direct sunlight to retain their flavor.
Refrigeration for Longer Shelf Life
For longer storage, refrigeration is recommended. When refrigerated, cake balls can last up to a week. Simply follow the same procedure as with room temperature storage: use an airtight container and separate layers with parchment paper. If you want to enhance your cake balls even further, consider dipping them in chocolate or vibrant candy coatings before refrigeration. This not only enhances flavor but also provides an extra layer of protection.
Freezing Cake Balls
Freezing is the best method if you want to enjoy your cake balls several weeks later. Individually wrap each ball in plastic wrap to secure their moisture and flavor. After wrapping, place them in a freezer-friendly bag or an airtight container. When you’re ready to indulge, simply remove the desired amount and let them thaw in the refrigerator overnight. This way, they maintain their freshly made taste.
Using Flavorful Variations
While you may enjoy traditional cake ball flavors, experimenting with different varieties can be exciting. For a twist on classic flavors, try making Pumpkin Cheesecake Truffles, which add a seasonal touch to your dessert table. Check out the recipe for these delightful treats at Pumpkin Cheesecake Truffles.
By following these storage techniques, your cake balls can remain just as delicious as the day they were made. Enjoy these treats any time with the knowledge that they are stored correctly!
Serving and presentation ideas for cake balls:
When it comes to serving cake balls, presentation is key! Start by arranging these delightful treats on a decorative platter or tiered stand, which adds height and elegance. To elevate the appeal, consider drizzling them with melted chocolate or colorful candy coating. For a seasonal touch, you might incorporate sprinkles or mini chocolate chips that match the theme of your event. If you’re planning a fall gathering, why not serve them alongside pumpkin cheesecake truffles? This pairing creates a delightful dessert table experience. Finally, for a personal touch, consider placing cake balls in decorative cupcake liners, which not only look charming but also make serving easy!
Frequently Asked Questions (FAQs):
What are cake balls made of?
Cake balls are a delightful sweet treat made from cake crumbs combined with frosting. Typically, you start by baking a cake, allowing it to cool, and then crumbling it into fine pieces. By mixing these crumbs with frosting, you create a moist, flavorful mixture that can be shaped into small balls. These little delights can be coated with chocolate or candy melts for additional texture and flavor.
How do I properly store cake balls?
To ensure your dessert balls stay moist and delicious, they should be stored in an airtight container. You can keep them at room temperature for a couple of days, but if you want to extend their freshness, refrigerating them is recommended. Just remember, allow them to come to room temperature before serving for the best experience!
Can I freeze cake balls?
Yes, you can freeze these tasty treats! Place the cake balls on a baking sheet in a single layer and freeze them until solid. Once frozen, transfer them to an airtight container or freezer bag. They can last in the freezer for about three months. Just thaw them in the fridge before enjoying.
What is the best way to decorate cake balls?
Decorating your cake balls can be as creative as you desire. After coating them in chocolate or melted candy, consider drizzling contrasting colors or rolling them in sprinkles or crushed nuts. To inspire your culinary artistry, check out the delicious cinnamon drizzle on apple crumb cake for decoration ideas.
Are cake balls gluten-free?
While traditional cake balls are not inherently gluten-free, you can easily make them suitable for those with gluten sensitivities. Simply use gluten-free cake mixes and ensure that your frosting also adheres to gluten-free standards. This way, everyone can enjoy the sweet, chewy goodness.
How long do cake balls last after being made?
When properly stored, these sweet morsels can last around 1 week. However, their best flavor and texture are usually experienced within the first few days. Keep an eye on them, as they don’t last long when you share them with friends and family!
Print
Cake Balls: Discover the Delectable Dessert Trend!
- Total Time: 50
- Yield: 4 servings 1x
Description
Delicious and fun cake balls made from your favorite cake mix and frosted, then coated in colorful candy melts.
Ingredients
Scale
1 box cake mix flavor of your choice
eggs
oil and water as called for on cake mix box
1 cup + 2 tablespoons canned frosting flavor of your choice
1 pound candy melts I recommend Ghirardelli Melting Wafers
1/2 cup sprinkles
Instructions
- Prepare cake mix with the amount of oil, water and eggs directed on the box. Bake in a 9”x13” pan according to package directions.
- Let cake cool completely, then break apart and crumble until fine crumbs form.
- Stir in the frosting until a dough forms. If the dough seems dry, you can add additional frosting, 1 tablespoon at a time, until desired consistency is reached.
- Roll the cake mixture into tablespoon sized balls. Place the balls on a parchment lined baking sheet and chill for at least one hour.
- Melt the candy melts in a bowl in the microwave, heating in 30 second increments, and stir until completely smooth.
- Place each cake ball on a fork and use a spoon to pour the candy melts over the cake ball. Tap against the side of the bowl to remove excess candy melts.
- Place each ball on a parchment lined sheet pan. Top with sprinkles.
- Repeat with remaining cake balls and candy melts. Store in the refrigerator until ready to eat. Can be made up to 3 days in advance.
Notes
These cake balls can be customized with any cake and frosting flavors to match any occasion.
- Prep Time: 20
- Cook Time: 30
- Category: Dessert
- Method: baking
- Cuisine: American
Nutrition
- Serving Size: 1 slice
- Calories: 120 kcal
- Sugar: 10 g
- Sodium: 55 mg
- Fat: 6 g
- Saturated Fat: 3 g
- Unsaturated Fat: 3 g
- Carbohydrates: 15 g
- Fiber: 0.5 g
- Protein: 1 g
- Cholesterol: 10 mg
Keywords: cake balls, dessert, easy dessert, party food, sweets